
Genio Notes – quick-start guide
This guide will help you get started with Genio Notes and be ready for recording, transcribing, and summarising your first lecture.
All steps shown are from the desktop version of Genio Notes. The app is, however, similar, and you should be able to follow this guide regardless of platform.
Genio Notes has a Guided Tour you can follow to get introduced to the program. Click the Guided Tour button on the bottom left of the application and follow the steps to get an overview of the program.
For more detailed instructions, click the Need Help? button in Genio Notes and choose which are you like to learn more about.
1. Create an account and sign in
Create an account
If you are eligible for note-taking support, you will have received an email invitation to your student email address with information about how to create an account.
If you have not already created an account, start by opening the email you received and follow the link and the instructions shown thereafter to create your account using your student email address. You can find your student email address in Ladok.
Sign in
Open Genio Notes and sign in using your university account. It looks similar to figure 1.
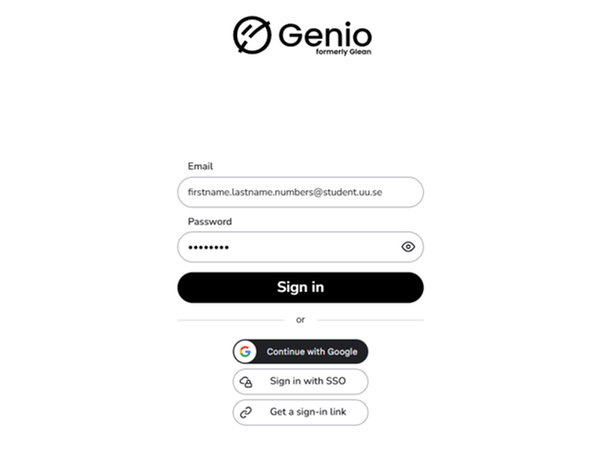
Figure 1: Sign in page for Genio Notes.
Once you are logged in, you will be put into the home page. This page gives you an overview of the latest Events you created. The first time you log on, the page will be empty as seen in figure 2 below. It will start filling up as you use the software and create events.
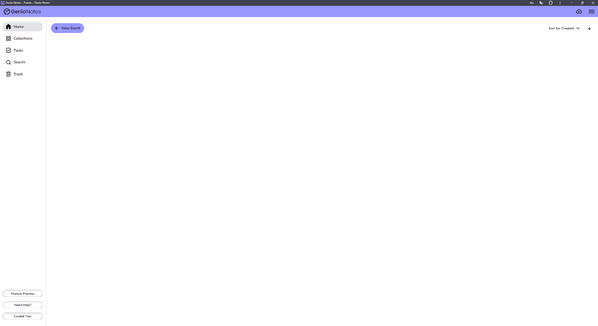
Figure 2: The home page of Genio Notes. The page is empty when you do not have any events created.
2. Create a new event
What is an Event?
An Event is what Genio Notes calls the page containing the recording, transcription, summary, your notes, photos and other attachments used during the session. This will page resembles a folder that contains everything you added during a session of notetaking.
Create an Event
Click + New Event to create a new event. You can find the button on the top-left side of the home page as shown below in figure 3.
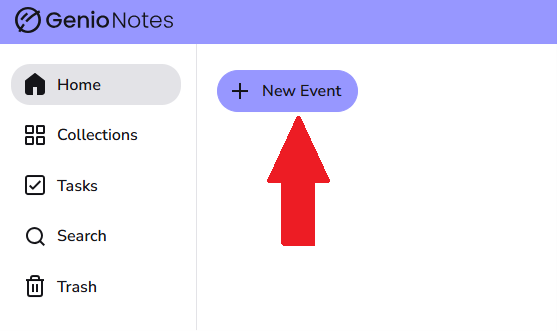
Figur 3: Knappen + New Event på startsidan
This will take you to the Event page as shown in figure 4. This is your hub for creating recordings, transcriptions and summaries. There are other functions you can explore here, but this guide will focus on getting you started with notetaking.
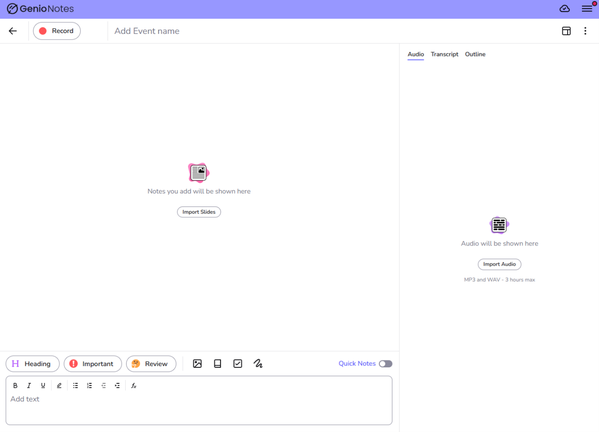
Figure 4: The Event page in Genio Notes. This is the hub in which your recording, transcription, summary (Outline) and notes are collected from one session.
There are multiple features heres that you can explore if you wish. The key components are however the big red Record button on the top left, adding an event name, adding your own notes at the bottom of the screen while recording, and using the Transcript/Outlines features on the right side of the screen. All these features are explained below in different sections of this guide.
3. Record
To start recording, press the red button on the top-left side of the screen marked Record, as shown in figure 5.
Important note: Recordings are for your own use and must NOT be shared with anyone else.
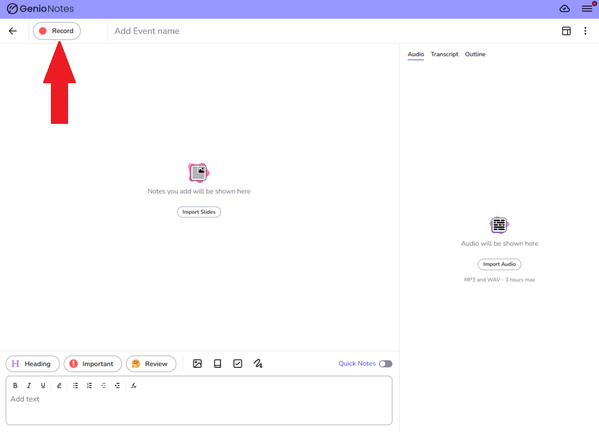
Figure 5: Press the red Record button to start recording.
A menu will pop up, see figure 6 showing recording options.
If you are in a physical classroom environment or lecture hall, choose the Microphone option. This will allow your device to record external audio via microphone.
If you are in a virtual lecture environment, such as zoom, choose either Audio for recording your computer audio output, or Audio & Mic if you are planning on speaking yourself and wish to include that part in the recording as well.
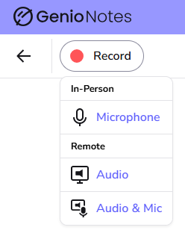
Figure 6: The menu showing different options for audio input.
The first time you choose a recording option, your device will ask for permission to access your microphone. You will have to give the program permission to access your microphone to be able to record audio.
Once you have given the program permission to access your microphone, the recording will start. You can pause or stop the recording any time you wish by clicking the pause or stop button as shown in figure 7.
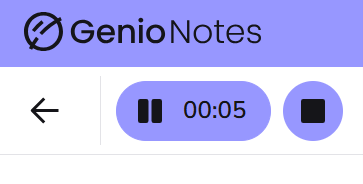
Figure 7: The pause and stop button.
You can see that the recording is underway, paused or stopped in the visual track on the right side of the screen.
4. Transcripts and outlines (summaries)
After recording, you can generate a transcript or outline of the recording. Outlines are what Genio Notes calls summaries.
If you wish to generate a transcript, you can click on the Transcript tab on the right side of the screen. If you wish to generate an outline, click on the Outline button instead, see figure 8.
Generating an outline will also generate a transcript, meaning you do not have to generate a transcript first to then generate a transcript.
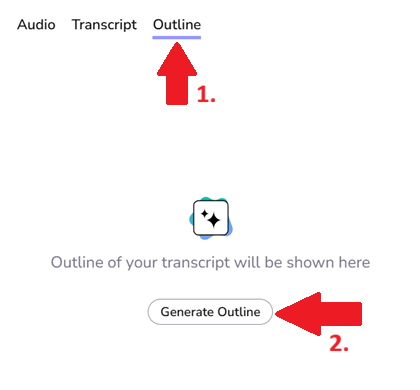
Figure 8: First click Outlines, then click Generate Outline.
Upon clicking either generate transcript or generate outline, you will be asked to choose a language for the text generation.
The program cannot translate, so the selected language must be the same as the one spoken in the recording.
Once the language is selected, click Transcribe Audio to start the generation, see figure 9. It will take a minute or so for the program to finish transcribing and creating the outline.
If your lecture includes formulas, check the box that says Yes, format formulas if detected.
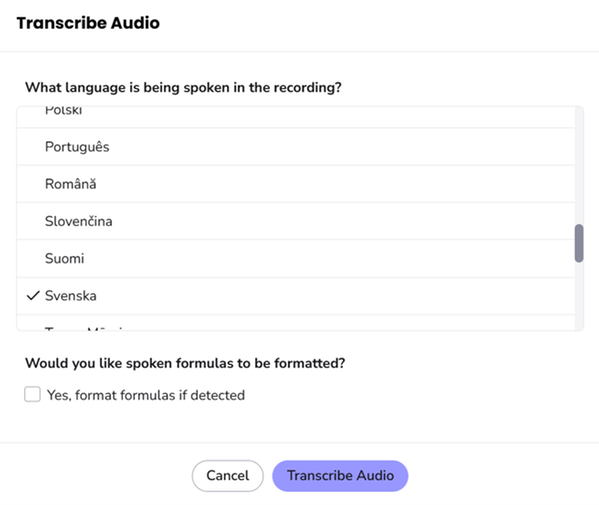
Figure 9: The pop-up with language selections and the option to format formulas.
If you find errors in the transcript or wish to regenerate it for other reasons, there is an option to regenerate the transcript. Click the three dots on the top right side, then click Regenerate Transcript, see figure 10.
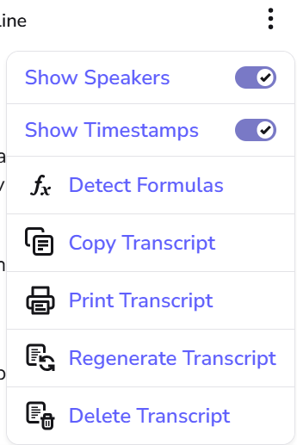
Figure 10: The menu shows different options for the transcript, including the Regenerate Transcript option.
5. Write your own notes
While the recording is underway, you have the option to create your own notes, as well as mark key moments in the recording as important, review or mark a new heading.
You can also input your own formulas using LaTeX code, as well as using a whiteboard function, and insert photographs. There is also an option to import a presentation before you start your recording session and thus follow along during the lecture.
All these options and more can be found in the note-section at the bottom of the screen as shown in figure 11.
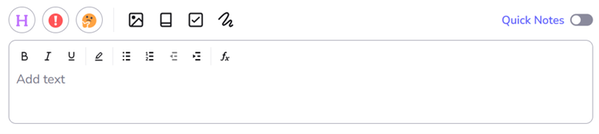
Figure 11: The note-section at the bottom of the screen includes many options for taking your own notes while recording.
Contact and support
Help with Genio Notes
Contact Genio Notes Support via chat or email. You can also book a support appointment with them.
Genio Notes includes a guided introduction within the tool. On the Genio website, you will find instructional videos and user guides in English.
Questions about note-taking support
Please contact a coordinator for targeted study support:
Uppsala: riktatstod@uu.se
Campus Gotland: riktatstod-cg@uu.se
Contact and support
Help with Genio Notes
Contact Genio Notes Support via chat or email. You can also book a support appointment with them.
Genio Notes includes a guided introduction within the tool. On the Genio website, you will find instructional videos and user guides in English.
Questions about note-taking support
Please contact a coordinator for targeted study support:
Uppsala: riktatstod@uu.se
Campus Gotland: riktatstod-cg@uu.se